Sunday, September 24, 2006

The MacBook Pro Round Two

I had an opportunity to sit down with the MacBook Pro again this past Sunday, (well three Sunday’s ago at the time of this writing), as I recorded Podcast 36 for Adventures in Podcasting. However, this time I once again crossed the line into the world of vodcasting. Now if you are a fan of the show you also know the show was published in three formats, (Vodcast, Enhanced Podcast and MP3). In this post I will share my experience in Vodcasting with the MacBook Pro.

As I tell my tale, I will explain the process I went through as I created not one, but all three formats. Then I will explain what I learned from the process and what I would change if I were to do another or make a habit of vodcasting with the MacBook Pro.

What I did….

Step 1 – iMOvie

I have never been enamored with built in microphones on any computer and considering the level of ambient noise in my home office, (air conditioner, fan and of course children), I chose to use my Audio Technica wireless microphone with the MacBook Pro. I believe it worked quite well. Once I had tested the microphone, I fired up iMovie switched the input to the iSight camera and began recording. In my normal fashion, I droned on for about 30 minutes or so. However, I did notice I was talking a bit faster than normal. Perhaps the camera made me nervous!

After the podcast video was complete, I began the learning process of creating the podcast in not one, but three formats. Wanting to have a snappy introduction, I shared the video file to Garage Band 3 where I quickly noticed my first mistake. I had no room for the introduction track and I wanted a still image displayed as my introduction track played. So… Back to iMove I went thus abandoning the initial import into Garage Band.

Back in iMovie, I moved the video forward 54 seconds. This happens to be the length of my introduction music. Next, I imported an image and placed this on the video track. I couldn’t have a dead screen while I talked could I? Just for good measure, (and I didn’t want to make this mistake twice), I placed an image on the end of the video track and extended the time this image would be displayed to match the exit tune I had previously created in Garage Band. Again, I shared the video file with Garage Band 3.

Step 2 – Garage Band

Once the video file was imported into Garage Band, I imported my introduction and exit audio placing these tracks in the appropriate locations on the timeline. Next I recorded the voice track for both the intro and exit tracks. Of course, I had to tinker with the volume level of the music audio so it wouldn’t drown out my own voice. From there, I shared the file with iTunes. (Yeah…) The vodcast file of Adventures in Podcasting, podcast 36 was complete.

Step 3 – Creating the Enhanced Podcast

Now that the video was complete, I still wanted to be able to post an audio version of my podcast. Earlier, I had noticed that iMovie would allow me to separate the audio from the video. With that in mind, I returned to iMovie.

In iMovie, I imported the completed video file. (If you recall, I had added the intro and exit music to the podcast in Garage Band therefore I could not use the original video recording.) Now that the completed video was imported, I separated audio from the video and shared the video with Garage Band. (Note: Even though the audio was split from the video, both tracks are still shared with Garage Band.)

Back in Garage Band, I deleted the video track leaving only the audio. Next, I added the chapters to the audio file and placed images on the chapter marks. (Sorry, I was lazy, I used the same image for each chapter.) Once the chapters were complete it was time to share the files with iTunes. A few minutes later, the Enhanced Podcast version of Adventures in Podcasting, podcast 36 was complete.

Step 4 – Creating the MP3 file

Creating and MP3 from a M4A file in iTunes had to be the easiest process of the project. All you have to do is Right Click and choose “Convert File to MP3” OOPS… Sorry, I had a mouse connected to the MacBook Pro. I could have also pressed Command, (open Apple for us old timers), and clicked on the file with the mouse. Viola, the MP3 version of Adventures in Podcasting, podcast 36 was also complete.

The last phase of this project was to post the files to the internet and publish the RSS feed. Unfortunately, it was quite late at this time so I chose to bun the three files to a data DVD and complete the process the following day.

I did, however, have an overwhelming urge to try out iDVD. So… In addition to Podcast 36 being available in vodcast and two audio formats, I have a DVD of the show as well.

In hind site…

The project with the MacBook Pro was really no different than my first several podcasts. I learned something with each step and if I were to do another vodcast using a MacBook Pro, I would do several things differently. In fact, the process would parallel the same steps I use to create Adventures in Podcasting.

The process I would use:

  1. Prerecord the introduction and exit tracks. This could be done with video or audio only.
  2. Import the introduction track into iMovie.
  3. Record the vodcast.
  4. Edit as needed.
  5. Import the exit track.
  6. Render the video.
  7. Upload file, update and upload the RSS file.

Considering I still prefer audio to video in my Podcast, I would also split the audio and complete the process of creating the MP3 file. That process, to my knowledge, would be the same as I noted above.

In the end, Adventures in Podcasting, podcast 36 took 7 hours to create in the three formats and it would be safe to say that 5 hours of that time was be learning how to do what I wanted to do. Following steps 1 through 7 listed above, a vodcast on a MacBook Pro wouldn’t take anymore time to create than a standard audio podcast. Noting one important fact… Podcast 36 was a talking head video which didn’t require much, if any, editing. If you plan to create a vodcast that is worth watching, (Sorry, my talking head is NOT interesting) you will need to plan for editing. Of course that is normal with any video project.

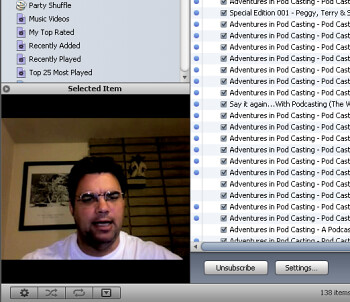
iLife and My Thoughts

iLive has to be flat out one of the slickest pieces of software I have ever used. Even after being away from a Mac for 8 years, I found this software intuitive. The integration between iMovie, Garage Band, iTunes, iPhoto and iDVD was absolutely seamless.

I said it before, and I will say it again, the MacBook Pro is an impressive machine. I still wish it had a right mouse button and came preloaded with both operating systems. Who knows, maybe by the time my Sony Vaio is due to be replaced I might get my wish.


Technorati
MacBook Pro Macintosh MacBook Podcasting Podcast Vodcast video cast K-12 Shawn Wheeler

Saturday, September 09, 2006

The Macintosh after an 8-year absence...

August 28, 2006 I had an opportunity to test-drive a MacBook Pro with an Intel processor running OS 10.4 Tiger. While this may not seem special to some, it was the first time in some eight years I had sat behind a Macintosh. (Okay, it was really the first time I sat behind a Macintosh with the intention of spending some time learning about the new tools the Mac has to offer.) However, before I get started I want to point out I am not anti Apple/Macintosh computers and this is not a Mac vs. PC article. The intent of this writing is to give a Windows users perspective of the MacBook Pro. Additionally, I did something bizarre as I explored this machine for the first few hours; I recorded the audio of my experience. When I finish writing this review, I will create a Podcast using the recorded audio of my experience. Of course, I will be using the Mac to create this Podcast.

How did the Mac make it to my desk?
I am an avid Podcaster and host of
Adventures in Podcasting a weekly archive of my adventures in teaching people in the Peoria Unified School District about the value of Podcasting and RSS. One of the folks who listens to the show is Steve Nelson, a Systems Engineer for Apple Computers.

Following a Podcast this summer, Steve sent me an email asking if I had experienced Garage Band or any of the other iLife tools. I explained to Steve the two Macintosh computers I own are a bit old to run the new software. (The two Mac’s I own are a vintage LC II and Performa 6400 with the Avid Cinema card.) Several email exchanges later; I am sitting at MacBook Pro typing this article.

My first thoughts…
I had not seen one of these computers up close and personal until I pulled it from the rugged case in which it was shipped to me. Opening the case the first time revealed a shiny silver machine. While the top of any machine is not that impressive, this little Mac captured my attention as I lifted it from the case. The sleek, sexy little machine bleeds Macintosh; at one-inch think weighing a bit over five pounds it is absolutely striking.

During a visual inspection of the case, I discovered two USB 2 ports, a six-pin fire wire connection, Ethernet port, external monitor port and, of course, analog connectors for headphones and a microphone. The front of this machine sports a thin door which is home to the DVD burner. As I connected the power cord to the MacBook Pro, I had to say “Wow!” as this was the most impressive power connector I had seen. Many laptop owners consider the power adaptor and connector the Achilles heal of the computer world. Considering the number of machines that have fallen to their premature death by to a person tripping over the cord, this connector is shear brilliance. The connector is a magnet and even has a cool LED so you know it is connected correctly.

As I fired this machine up for the first time, I have to say I was a bit shocked when I looked at the screen and I saw my face looking back at me. It was at that time I noticed the very tiny camera mounted in the lid just above the screen. Wow, if this machine came with an assistant to actually do the work, it would have everything!

Working with a few of the applications…
Once I was over the shock of seeing my ugly mug on the screen, I began to explore some of the applications.

I was very curious how RSS, more specifically, Safari worked with RSS feeds. Needless to say, that is where I began. In truth, I had seen this feature several months back but never had an opportunity to play with it. What I did like was the fact the Safari browser automatically displays the RSS feed in a readable format. You also have the ability to subscribe to the feed thus removing the need for a separate RSS reader application. In the end, I still like RSS reader applications better. However, this is a matter of personal choice, not the Safari browser.

Photo Booth
Following Safari, I dove into Photo Booth, which of course takes advantage of the slick little camera mounted in the lid. I had a ball with this software; in fact I think I took about twenty-five very silly images. Having stated that, a picture is worth a thousand words… So here are a couple examples.


The rest are available on my Flickr page. Take a look.
http://www.flickr.com/photos/shawnwheeler/sets/72157594259162297/

Garage Band 3
One of the major reasons for testing this machine was the chance to work with Garage Band. In fact, I told Steve I would even do a Podcast with this machine. Being true to my word, Adventures in Podcasting,
Podcast 35 was published in both M4A Enhanced and MP3 versions.

Garage Band is a nice piece of software and easy to use. It did take me a little longer to create the show in Garage Band than it does in Audacity. However, considering it was the first Podcast I had done in Garage Band, additional time is reasonable. The other reason for the extended time was the fact I created an enhanced Podcast.

An enhanced Podcast allows the podcaster, (me), to break the show into chapters. In addition, links can be placed in the chapters that allows the listener, (or in this case, the viewer), to open a web page while the Podcast is being played. I really like the chapter feature as it allows you to jump around in the audio file. However, this does have a downside. The listener must listen to the show using QuickTime, iTunes or an iPod. If the listener wishes to visit a web site linked in the chapter, they must be at a computer running one of the two versions of software noted above.

iTunes does allow the M4A files to be converted to MP3 format thus making the file available for MP3 players. During this conversion, the enhancements are lost. For this reason, I posted the show in both MP3 and M4A formats.

I am ashamed to say I did a very poor job in my exploration of Garage Band because it was not until I sat down with Steve and Joan that I learned how to make any custom music using the built-in loops for which Garage Band is famous. After a two hour meeting with Steve, I was dangerous and back home I went to play.

The one thing Garage Band can’t do is give a person with NO talent, talent. Then again, listening is believing and you can listen to this process in the chapter “What I learned from Steve & Joan” which is on part two of the Podcast, The Macintosh after an 8-year absence... If you are going to listen to the MP3 version, it is about 30 minutes into the show.

I did struggle with two items while using Garage Band:

  1. Garage Band would not import the 8 bit wav file format my digital recorder created. Not a major issue, a quick run through Audacity put the files in a format that could be read.
  2. Garage Band has a maximum time limit. While I am not clear on the exact limit, I did have a difficult time creating a Podcast over 65 minutes. (I know some people are really praising Garage Band for that. ) This is the reason I had to break the evaluation into two separate Podcasts.

Overall Garage Band 3 is impressive and deserves all the praise it receives.

iPhoto
IPhoto is another nice application that comes loaded on the MacBook Pro and reminded me of Picasa by Google. This application allows you to view and make minor editing changes to your images. In addition, this software allows you to create cards and calendars from the digital images saved on the machine. I also noticed buttons to order prints on-line and iWeb, the Apple web page tool.

Comic Life
Comic Life looks like pure fun for a person with time and a desire to create. The product comes with an number of page templates which will allow you to create a… Comic book. While I enjoyed making a quick collage using the images I snapped off while testing Photo Booth, (see the image shown above), I know other people would marvel at the chance to make custom posters or even their own comic book.


Office 2004 for Mac
I can’t say much about Office for the Mac because the only application I opened was Word, (I am typing in it now.) I can say it does take some getting used to as the menus are somewhat different from the PC version. However, if a person keeps an open mind and is willing to look a bit, the tools most people require are available.

Other Items
At the time of this writing, I have not had a chance to play with iDVD or iSight. While I don’t believe I will have an opportunity to create a DVD, I am planning to create another Podcast on this machine. However, this time I will also try to create a Vodcast using iSight. Visit
Adventures in Podcasting, Podcast 36 or more appropriately, Vodcast 36 to see if I was successful.

Parallels
Being a PC user and this being an Intel based computer, I just had to try out Parallels. Yes, I have read about this and know it worked but I just couldn’t get past the feeling of, “I have to see it to believe it.” With that said, I downloaded the 30-day demo of Parallels and loaded Windows XP on this machine. It booted, I pulled up the Peoria web site, looked at the statistics on the
Adventures in Podcasting page and shut it down. What can I say… it worked.

And finally

To be completely honest, there were a couple items on this machine I didn’t care for and please note two are a matter of personal opinion.

  1. I love the look of the DVD door on the front of this machine. However, I couldn’t help remembering the days of the Mac Classic II when my favorite tool was a paper clip that would allow me to eject a stuck floppy disk. How in the world do you get a disk out of this machine if it doesn’t want to give it back to you?
  2. As a general rule, I don’t like track pads. I know they are on almost every laptop built and I do use them, I just don’t like them. For that reason, I plugged my USB mouse into this machine. Out of habit, I clicked the right mouse button and was shocked to see a window of options appear before my eyes. After two days of pressing the ctrl key down to see these options, I have to seriously ask, why isn’t there a right button on the track pad?
  3. Heat… If you have read anything about this machine, you have read about the heat it puts out. While it is not unbearable, it is warm on the left side. On several occasions, I had to stop typing this article to let my left hand cool. Of course, I should also point out if I was using proper typing form; my hand wouldn’t be on the machine. (Shame on me, I used to teach typing.)

I like the fact this machine will run Windows as well as the Mac OS and for most people who need to live in both the Windows and Mac world, this machine with Parallels loaded is a nice alternative to owning two machines. However, in my case, I might lean more towards boot camp. I would like to see Apple sell this machine preloaded with both Tiger and Windows. Wow, if that happened, Mac and Windows people would have no one to argue with!

To close this out, I will say I am very impressed with this machine, the next time you are in the market for a laptop, give the MacBook Pro a serious look. I know I will.

If you would like to listen to the Podcast of my adventure with the MacBook Pro, visit the “
The Macintosh after an 8-year absence… The Podcast” site. You may also subscribe to shows by pasting this URL in your favorite Podcast catcher. (http://staffweb.peoriaud.k12.az.us/Shawn_Wheeler/Macintoshafter8years/MacBookPro.xml)

Note: The feed contains four total files, two MP3 files and two M4A Enhanced Podcast files.


Technorati Tags
Technorati, MacBook Pro, Macintosh, Mac Book, Podcast, Podcasting, K-12, Shawn Wheeler